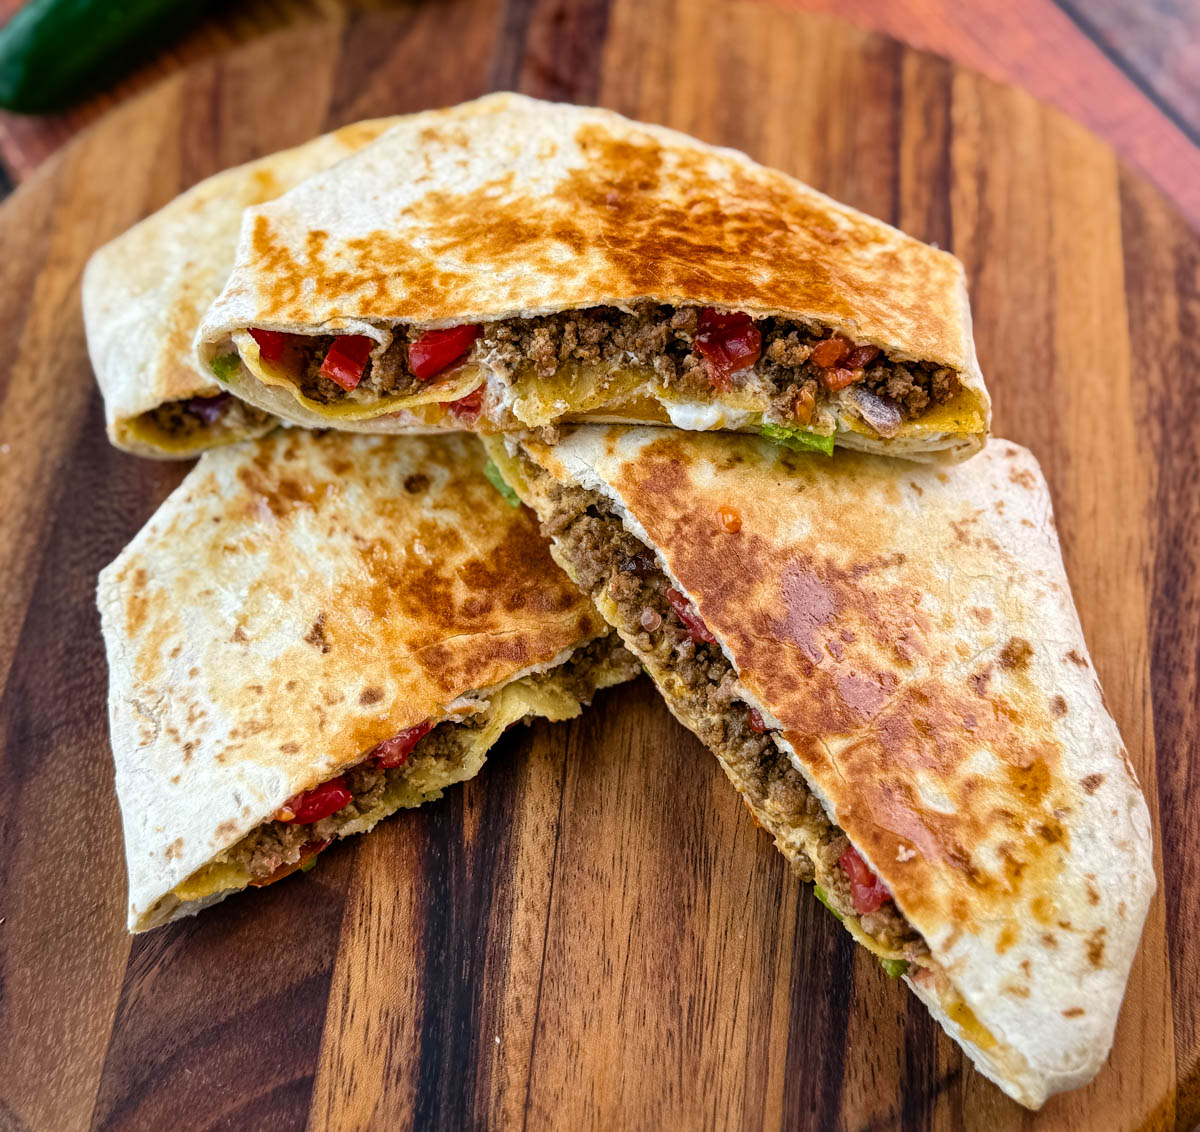
If you’ve ever craved that crispy, cheesy, beefy crunch wrap from the drive-thru, this homemade version is about to blow you away. These ground beef quesadillas are packed with flavor, easy to customize, and come together with simple ingredients you probably already have on hand.
Want to save this recipe for later?
We’re talking seasoned beef, creamy queso, crunchy tostada shells, fresh toppings, and that golden, pan-crisped tortilla that holds it all together.
You should check out my 25 Recipes With Ground Beef for a collection of the best recipes!
| Yields: | Prep Time: | Cook Time: | Total Time: |
| 5 quesadillas | 25 mins | 15mins | 40mins |
Table of Contents
Key Ingredients
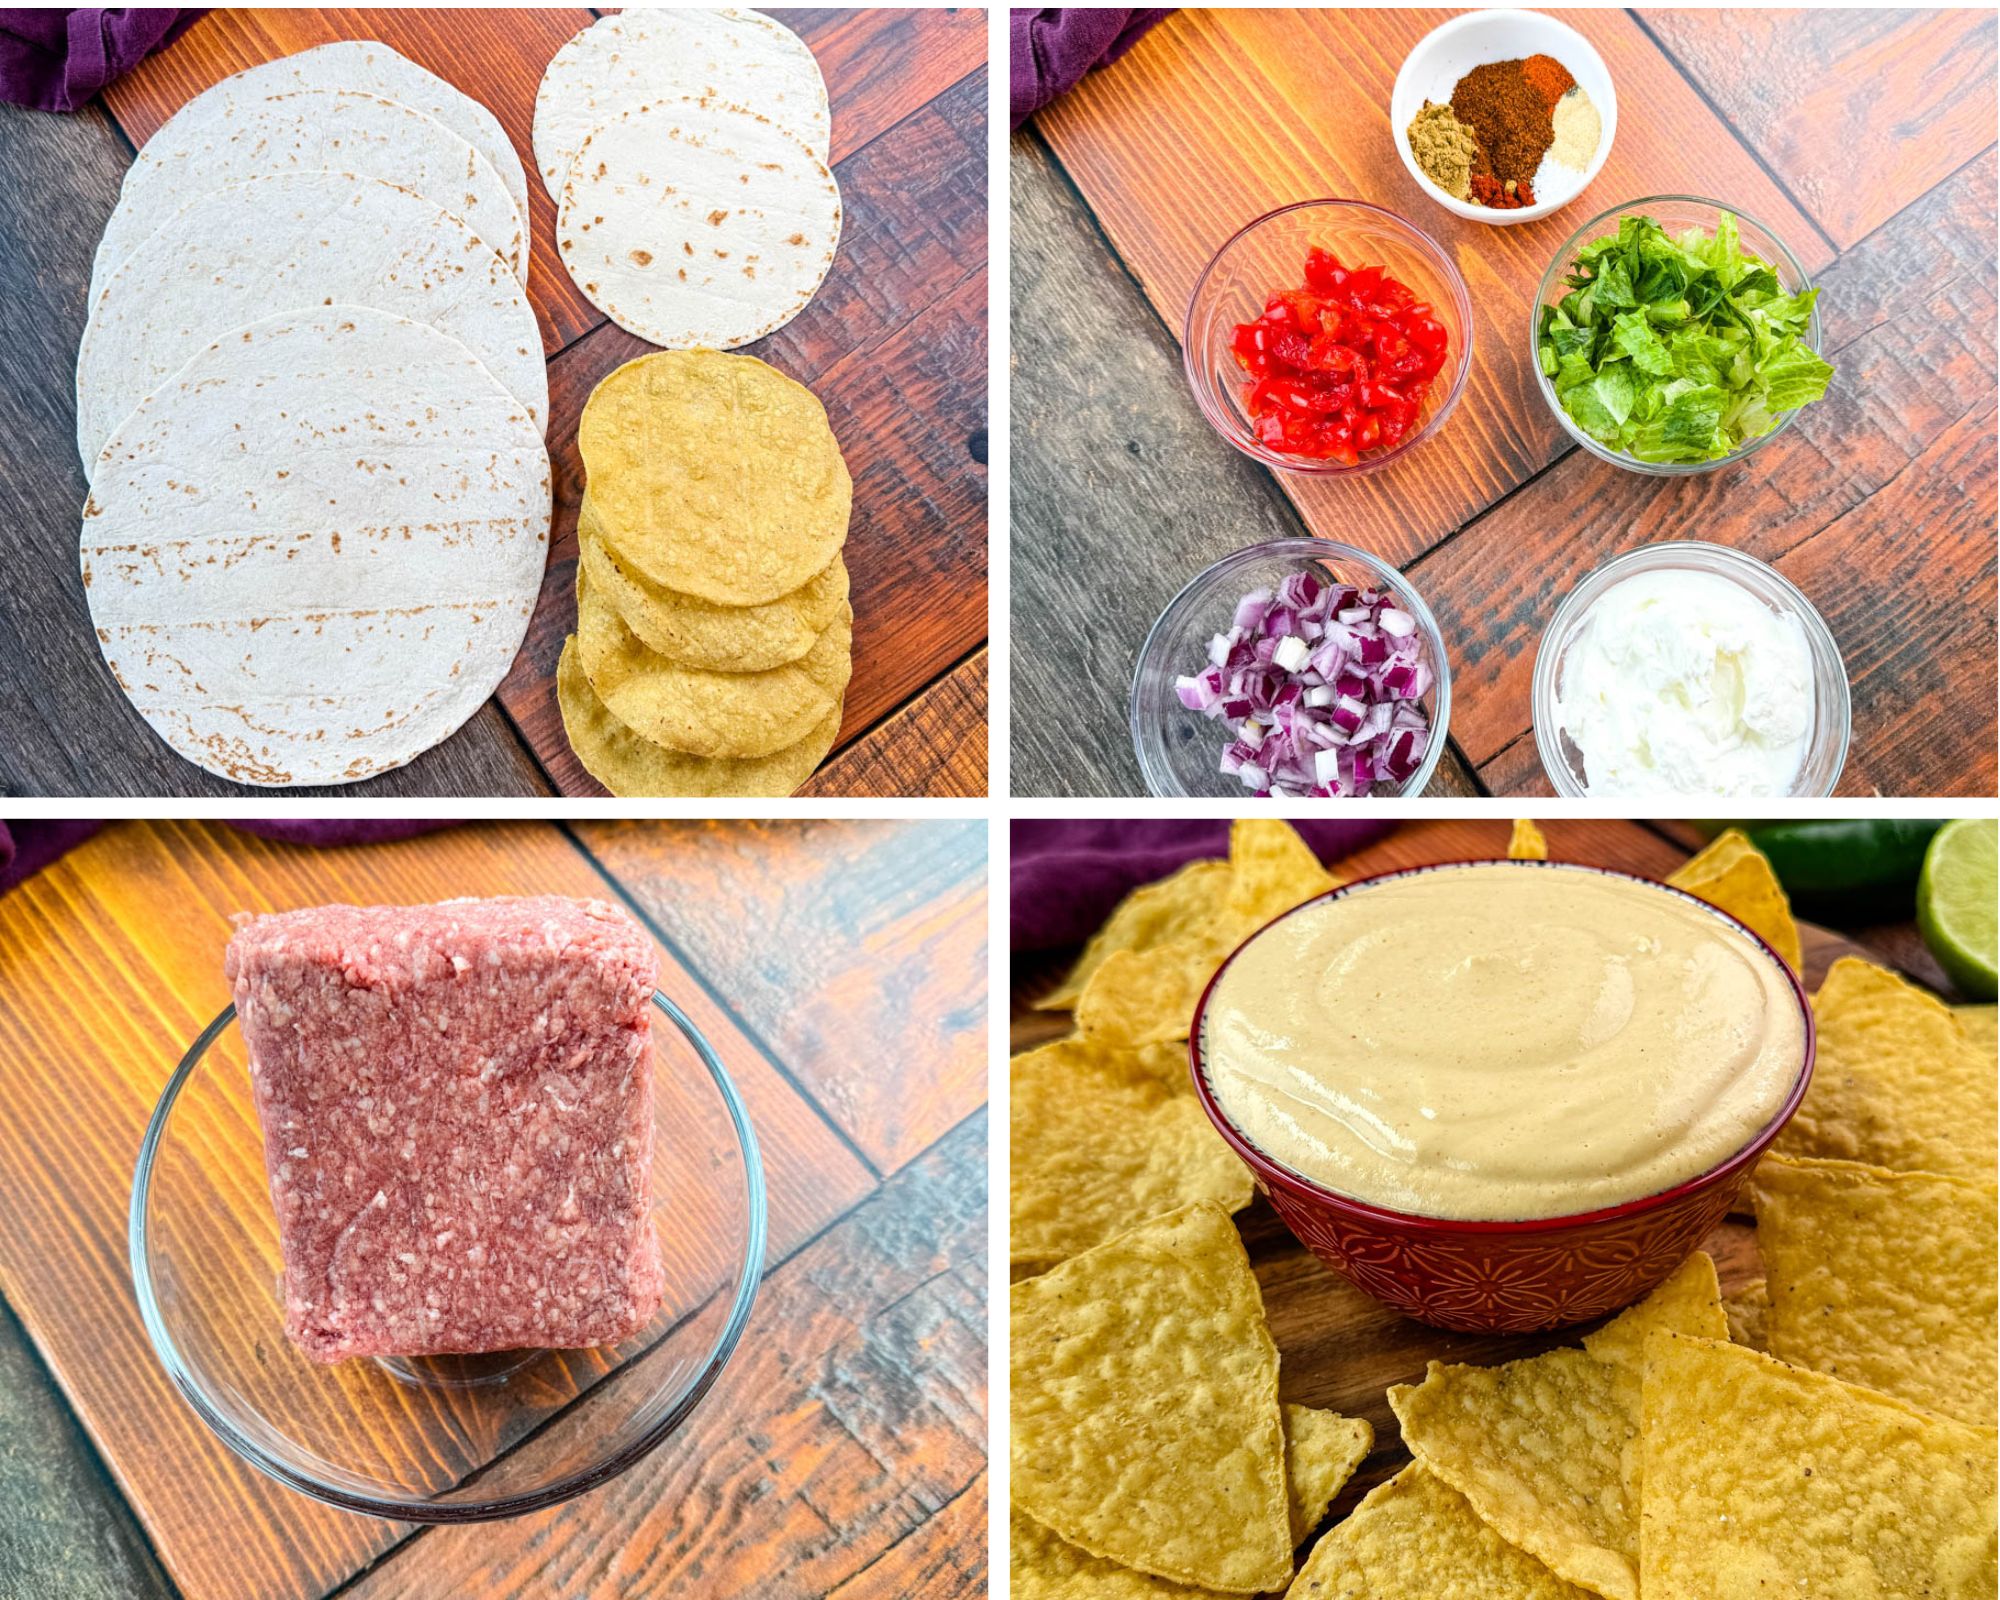
- Tortillas – These are the foundation! A large flour tortilla holds everything together and gets that golden, crispy finish when grilled. It’s what makes it a wrap instead of just a taco. 10-inch extra large burrito size tortillas work best. I used large burrito size, about 9-inches and these work, too.
- Tostada Shells – The star of the crunch! It adds that signature crispy layer in the center that contrasts beautifully with all the soft, melty layers.
- Ground Beef or Ground Turkey – Savory, seasoned ground beef brings the bold flavor and hearty filling. You can season it however you like—taco seasoning works great here!
- Onions – Cooked with the beef for added flavor and a little bite.
- Nacho Cheese Sauce (I used my Homemade High Protein Queso) – This adds a creamy, cheesy layer that melts into everything. It makes each bite gooey and flavorful—plus, using homemade queso gives it a protein boost and a fresher taste!
- Tomatoes – They bring freshness and juiciness that lightens up the richness of the wrap.
- Lettuce – Adds cool crunch and a little color contrast. It’s the fresh layer that keeps it from feeling too heavy.
- Plain Greek Yogurt or Sour Cream – A creamy, tangy finish that ties it all together. Greek yogurt is a great high-protein swap if you're keeping things lighter!
How to Make Cheesy Ground Beef Quesadillas
Detailed measurements and full instructions can be found in the recipe card at the bottom of this post.
- Cook the Ground Beef: In a skillet over medium heat, cook the ground beef until the meat is browned. Drain any excess fat. Pat the beef dry with paper towels to blot any excess fat. This will help prevent soggy quesadillas.
- Season the Beef: Add the taco seasoning and diced onions to the skillet and stir to combine with the meat mixture.
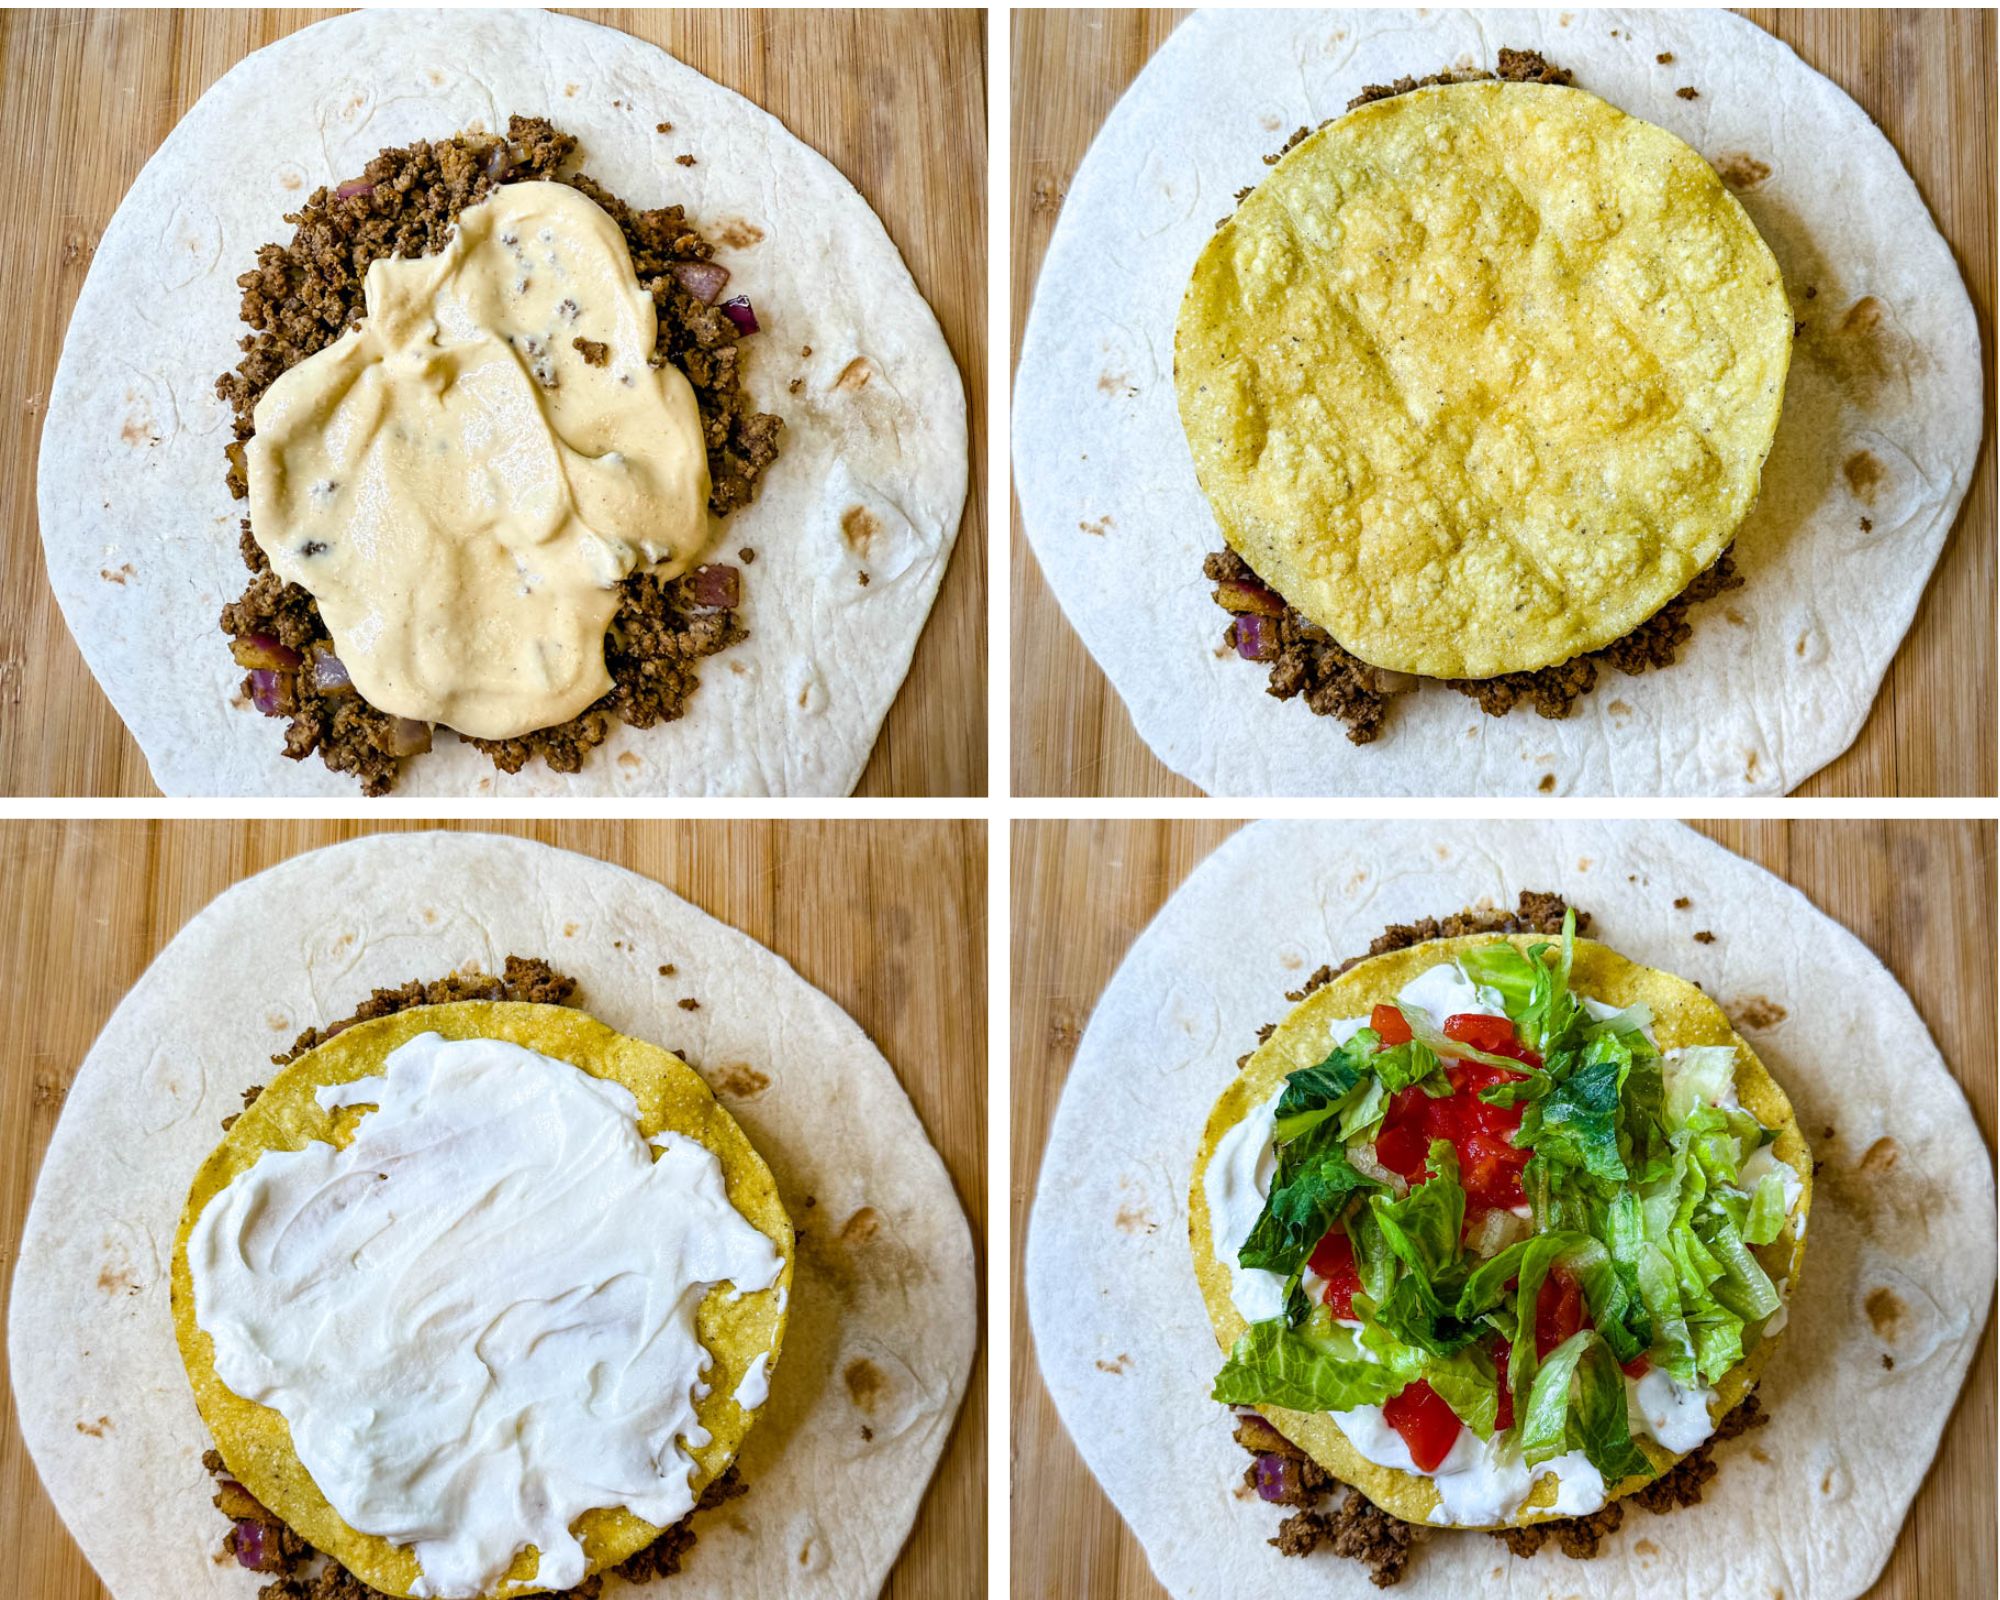
- Layer Your Ingredients: Start by placing a large flour tortilla on a flat surface. Add your filling (like seasoned beef, cheese sauce, and any toppings) in the center, creating a circular mound. Keep the filling about 1–2 inches from the edges.
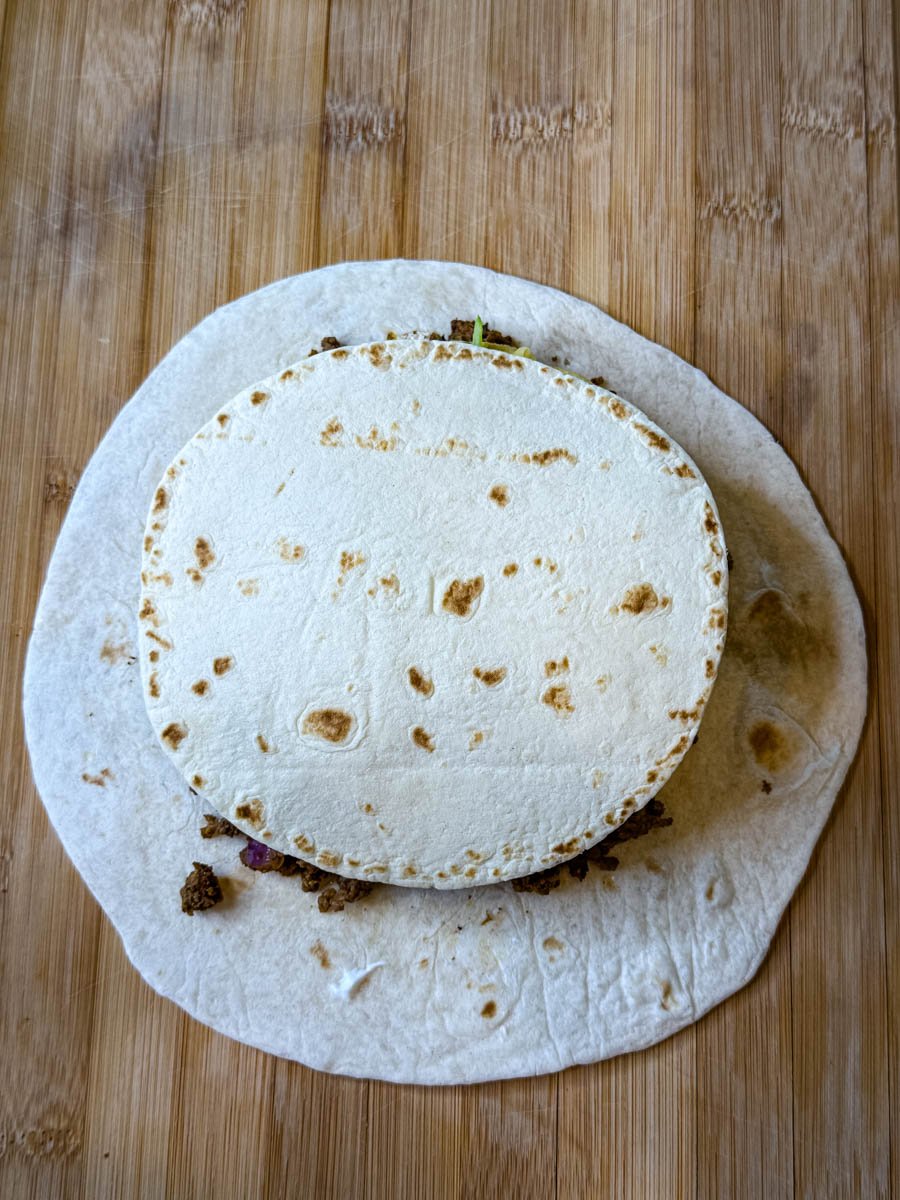
- Top with a Small Tortilla: Place a smaller flour tortilla (or a trimmed piece of a large one) directly over the filling to help seal the wrap and prevent spillage.
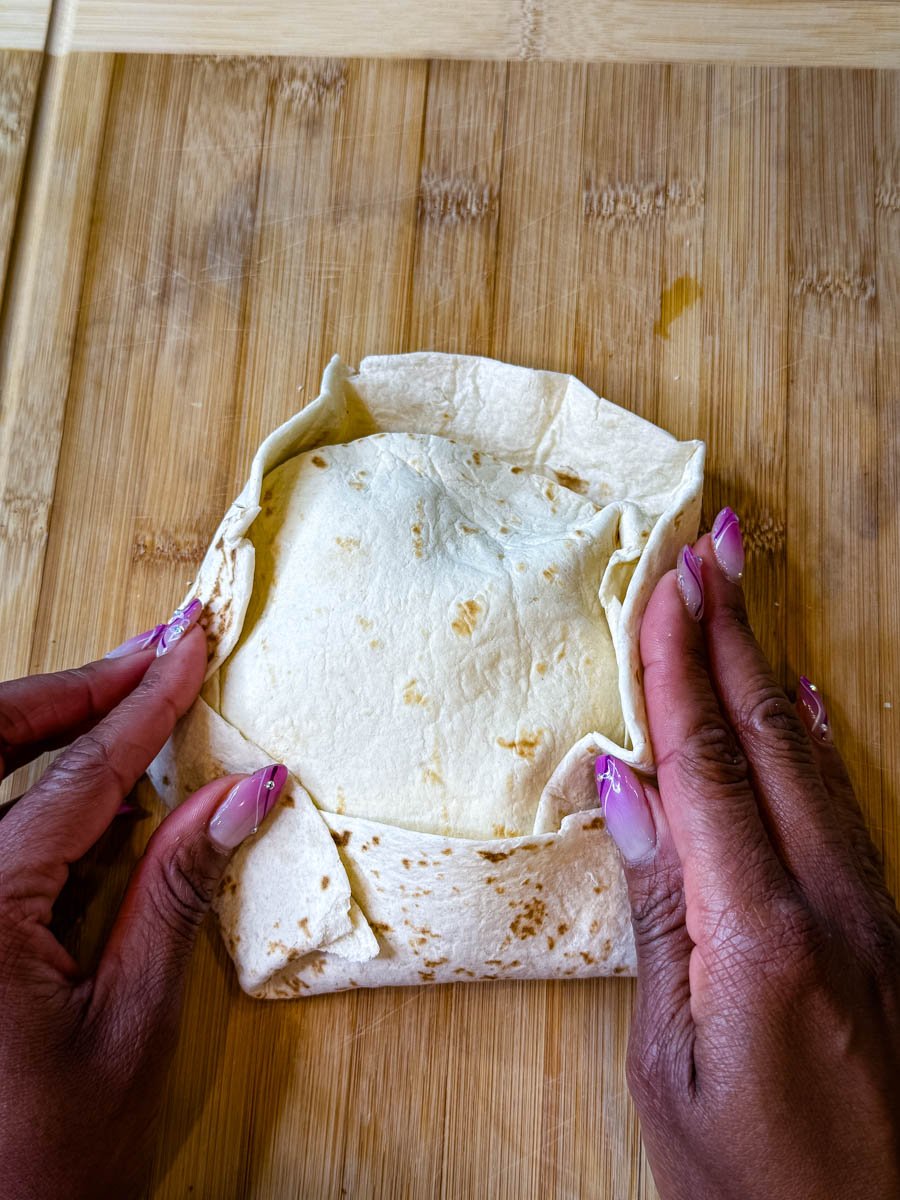
- Start Folding: Begin at one edge of the large tortilla and fold it up over the center. Continue working around the tortilla, making small pleats or folds, overlapping each one tightly over the last to form a hexagon or circle.
- Seal the Edges: Make sure the folds are tight and secure. The crunchwrap should be fully closed with no filling exposed.
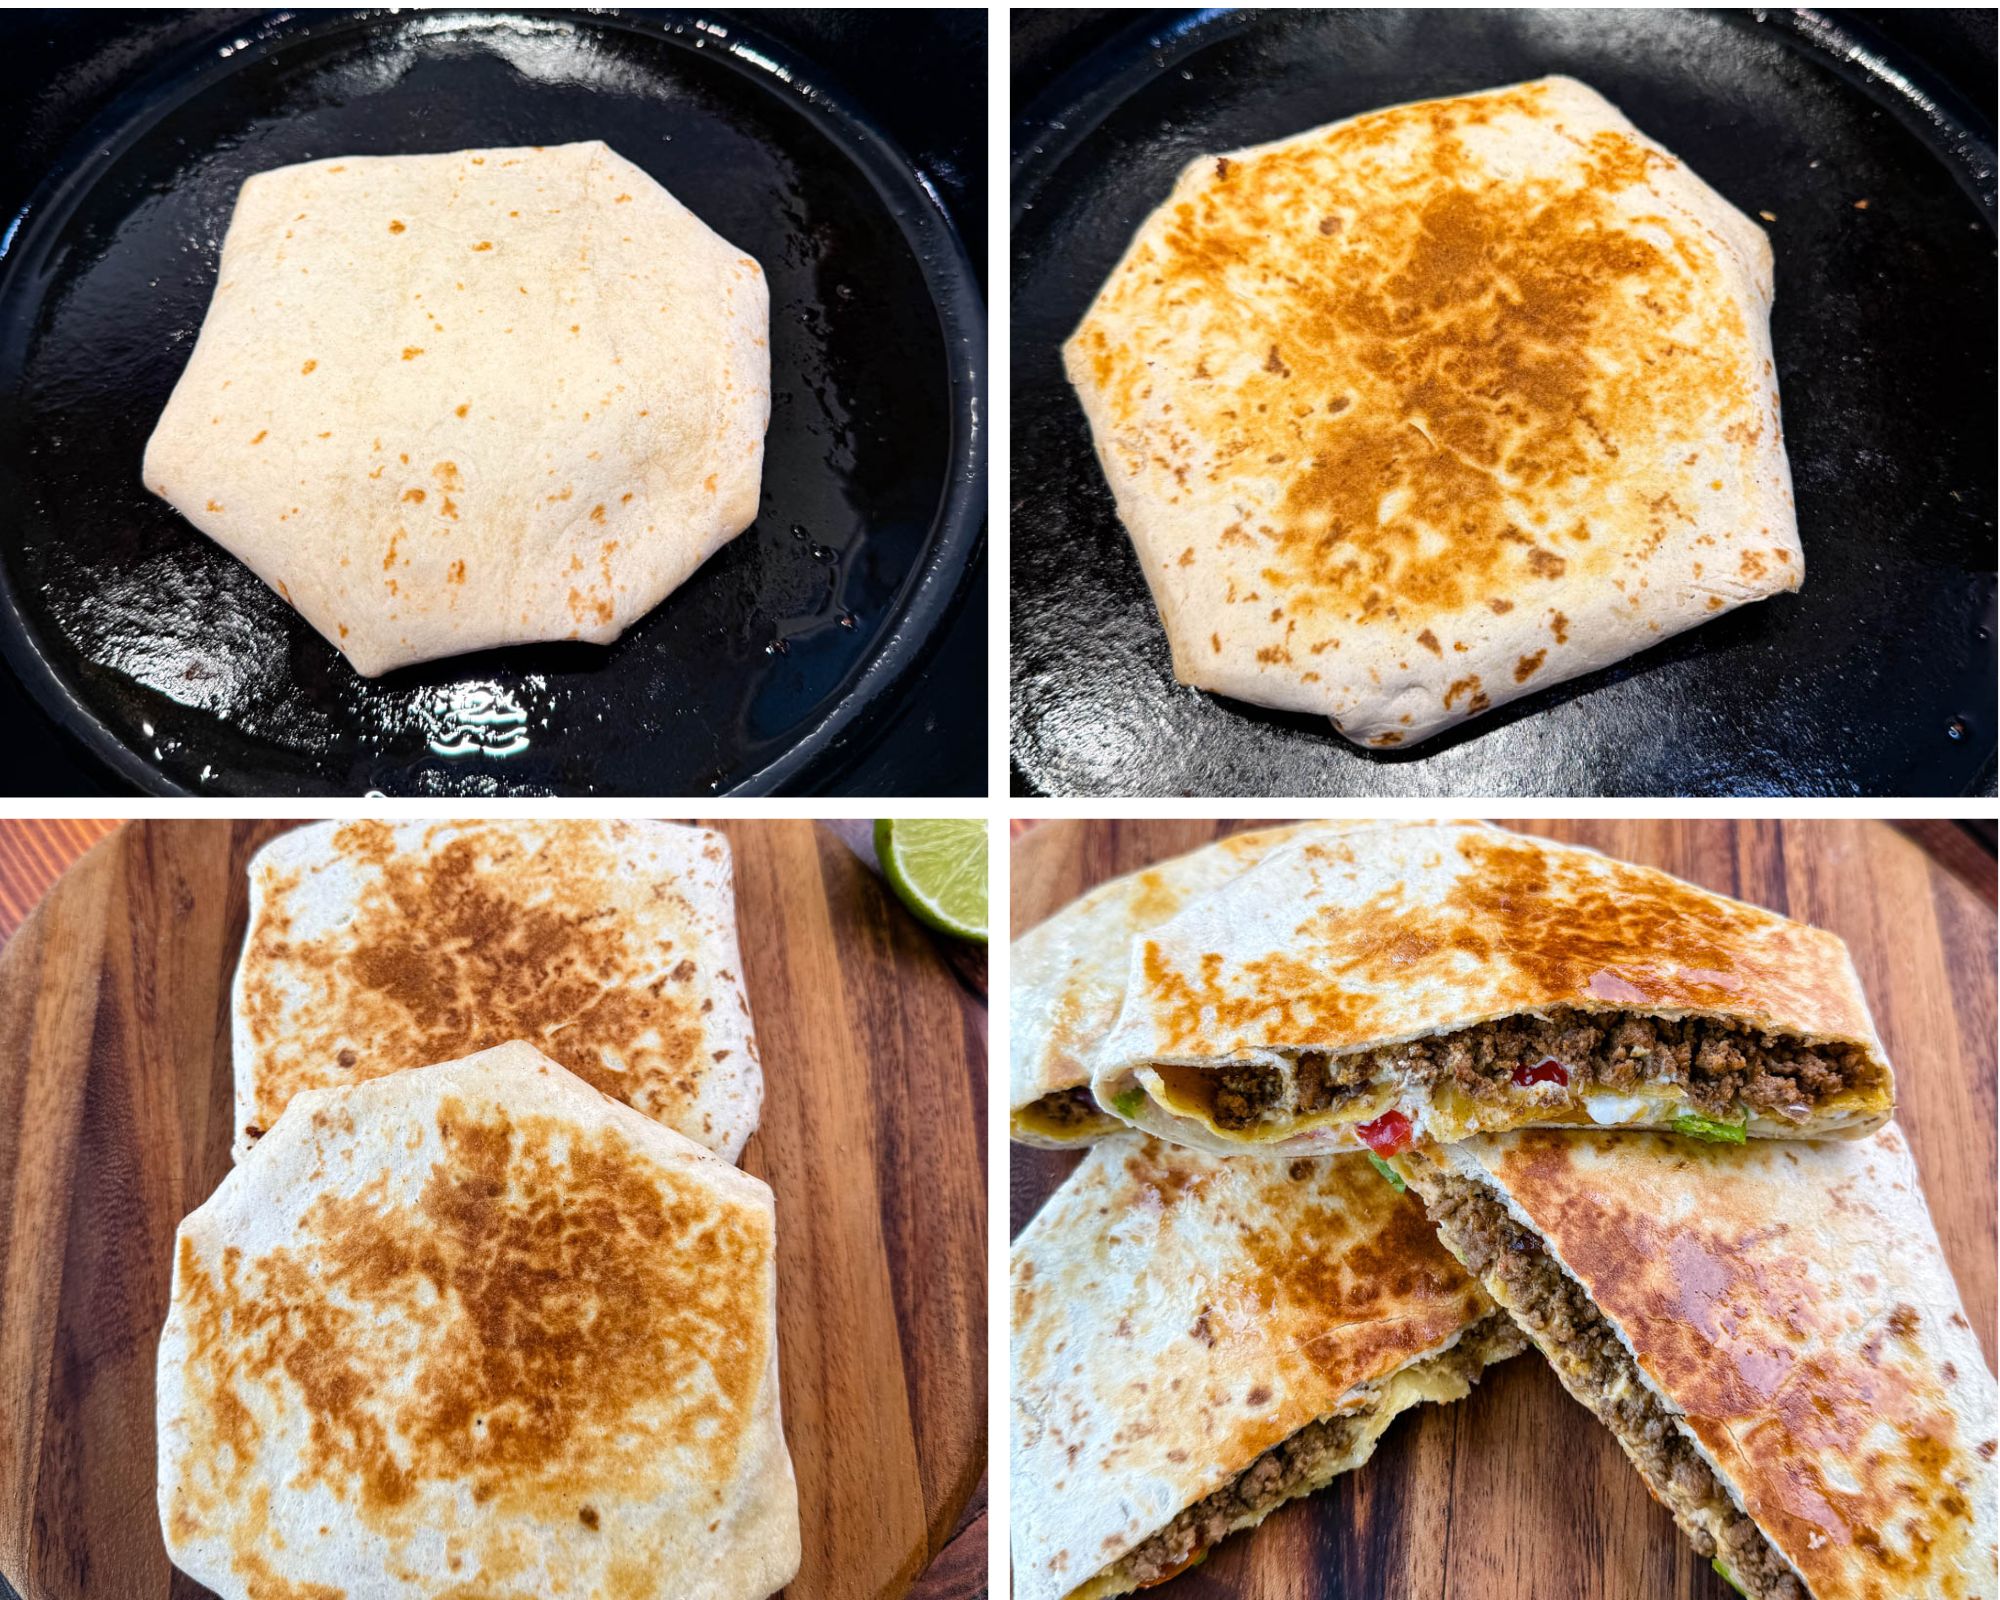
- Cook Seam-Side Down: Heat a skillet over medium heat and place the crunchwrap seam-side down. Cook for 2–3 minutes or until golden brown. Flip and cook the other side until crisp and golden.
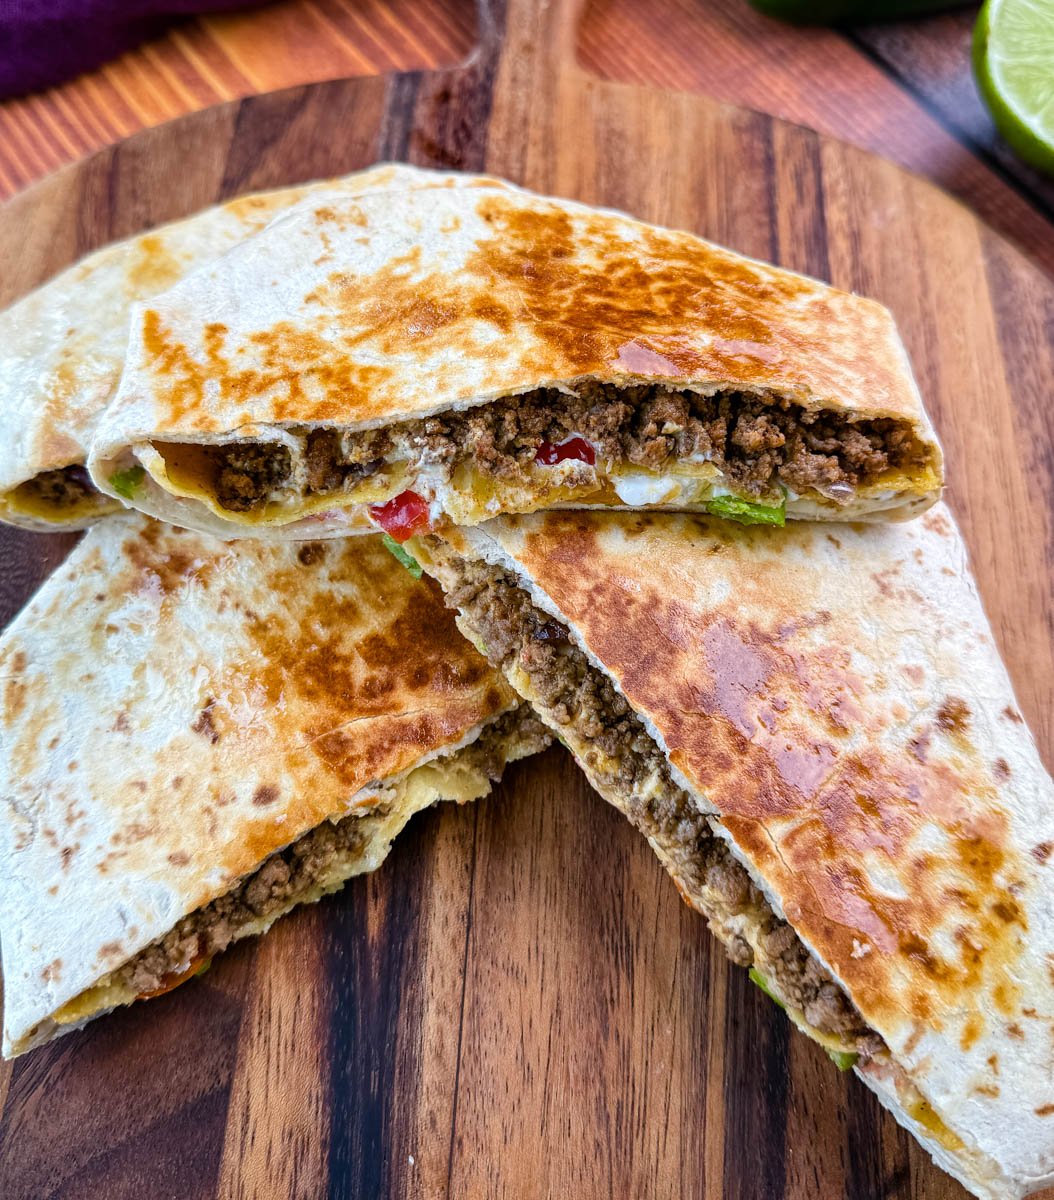
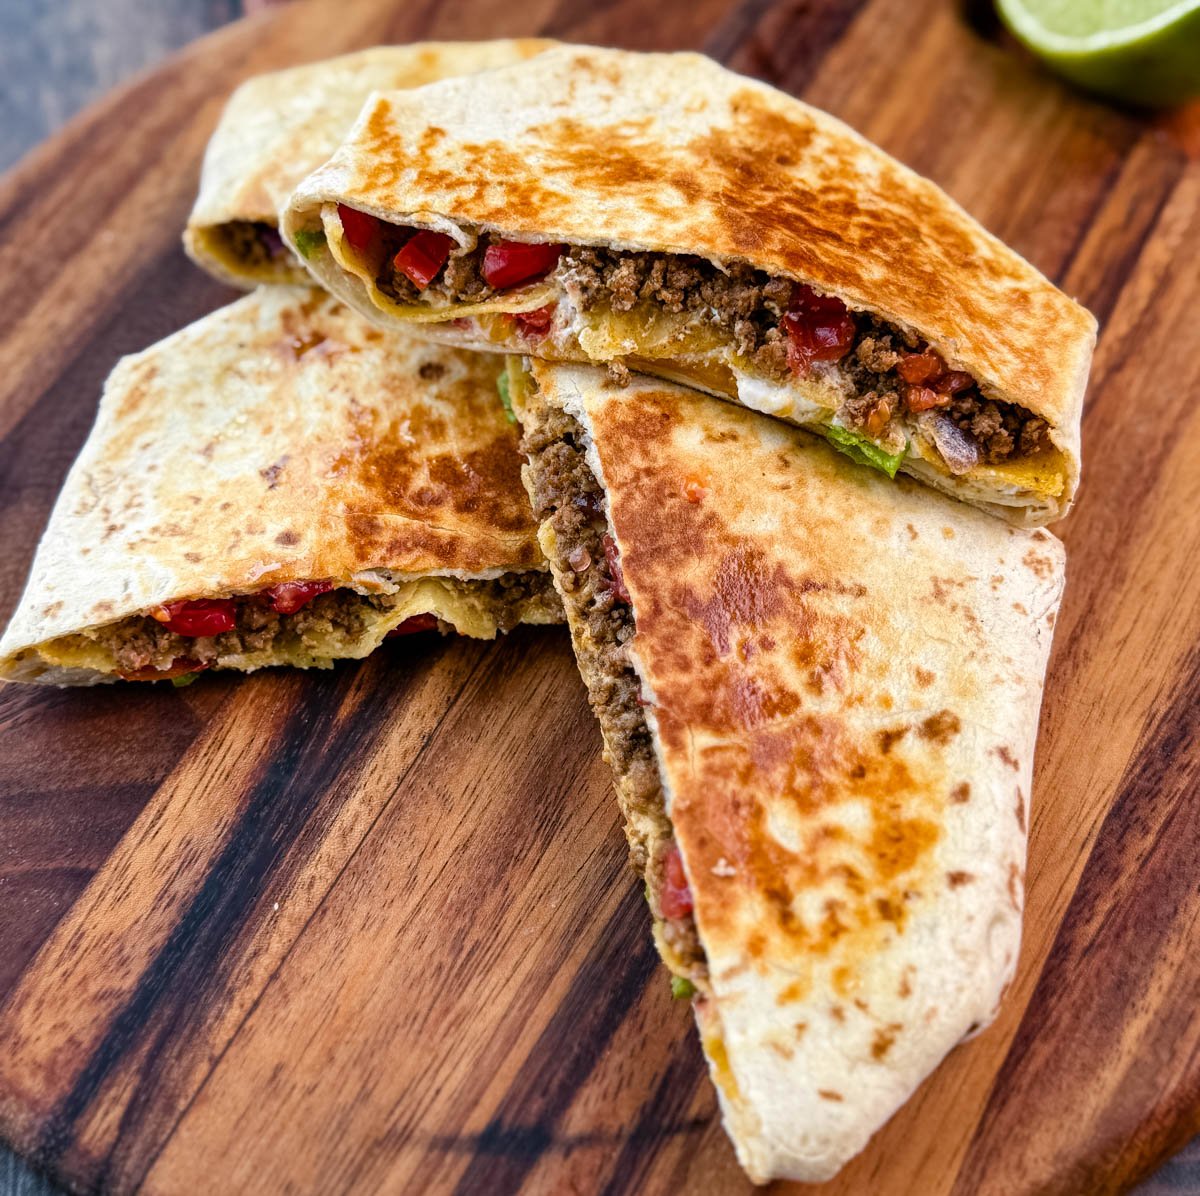
- Serve & Enjoy: Slice in half and enjoy warm while it’s crispy and melty inside!

Why You Need the Extra Small Tortilla
- To Seal the Filling: The extra tortilla acts like a “lid” on top of your filling mound. Without it, there’s a hole in the center once you start folding, and your fillings can spill out when cooking or flipping.
- To Hold Its Shape: It gives the folds something to grip onto, helping the crunchwrap stay flat and evenly sealed in that iconic hexagon shape.
- To Prevent Leakage During Cooking: When you grill the crunchwrap seam-side down, the extra tortilla creates a barrier so melty cheese, sour cream, or beef doesn’t ooze out.
No small tortilla? You can cut one of your large tortillas into a circle or wedge that fits the center. It doesn’t have to be perfect—just enough to cover the filling.
Substitutions and Add-ins
- Jalapeños (fresh or pickled)
- Avocado or guacamole
- Refried beans
- Black beans
- Corn
- Green chiles
- Hot sauce
- Cilantro
- Shredded pepper jack cheese
- Sliced black olives
- Cooked bell peppers
- Chipotle mayo or spicy ranch
- Lime juice
- Sautéed mushrooms
- Crushed tortilla chips (for extra crunch)
Frequently Asked Questions
Cast Iron Skillet –
Holds heat evenly and gives the crunchwrap a perfect golden, crispy exterior. Ideal for that restaurant-style sear.
Nonstick Skillet –
Easy to use and clean, great if you're using less oil or want to avoid sticking. Just make sure it's large enough for the crunchwrap to lay flat.
Griddle or Flat-Top Pan –
If you're making several at once or want lots of space, a stovetop griddle gives you room to work and even browning.
Yes! You can prep all the components in advance—just assemble and crisp them up in a skillet or air fryer when you're ready to eat so they stay crunchy.
Make sure your tortilla is large enough to fold over the filling completely. If needed, use a small piece of extra tortilla to cover the center before folding to help seal it up!
Absolutely. Ground turkey or chicken work great if you’re looking for a leaner option. Just make sure to season well for flavor!
If you don’t have tostadas, you can break up tortilla chips for crunch or bake your own using corn tortillas.
You can swap the cheese and Greek yogurt/sour cream for your favorite dairy-free alternatives. Just keep an eye on the melt factor when using vegan cheeses.
Kind of—but not entirely. When you sear the crunchwrap in a pan, the tostada shell inside will retain some crunch, especially right after cooking. But the longer it sits (especially with moisture from beef, cheese sauce, or sour cream), the tostada will start to soften.
How to Keep the Wrap Crunchy
Layer smart: Put wet ingredients (like sour cream or salsa) on top of the tostada, not underneath it. That keeps the bottom from getting soggy.
Serve immediately: These are best enjoyed right after searing—hot, crispy, and melty.
How to Store
Wrap each quesadilla tightly in foil, parchment paper, or plastic wrap. This helps keep them intact and prevents freezer burn if freezing. Store in an airtight container or zipper bag for up to 3–4 days.
How to Reheat
Oven or Air Fryer (Best for Crispiness):
Unwrap and bake at 350 degrees for 10–12 minutes, or air fry at 375 degrees for 5–7 minutes until hot and crispy.
Microwave (Quickest):
Remove foil, wrap in a damp paper towel, and heat for 1–2 minutes. It won’t be as crispy, but it still tastes great.
Freezer Tips
Wrap tightly and place in a freezer-safe bag. Store for up to 2 months. Defrost in the fridge overnight.
Pair With These Recipes
Ninja Slushi Margarita Slush
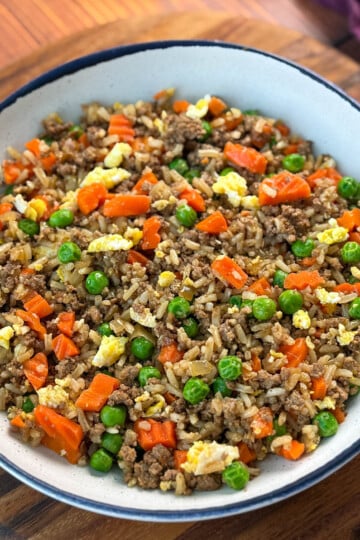
Beef and Rice Skillet
Smoked Salsa
Taco Bell Creamy Jalapeno Sauce
Air Fryer Tortilla Chips
Chipotle Cilantro Lime Rice
Oven Baked Roasted Corn on the Cob
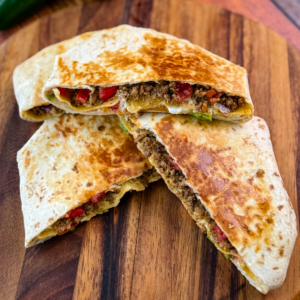
Cheesy Ground Beef Quesadillas (Crunchy Supreme)
Want to save this recipe for later?
Equipment
Ingredients
- 1 pound ground beef or turkey
- ½ cup diced onions
- 5 9-10 inch tortillas 10 inch extra large burrito size tortillas work best. I used large burrito size, about 9 inches and these work, too.
- nacho cheese sauce I used my homemade queso, ¼ cup in each wrap.
- 5 tostada shells
- 1 cup plain Greek yogurt or sour cream
- 1 cup diced tomatoes I used fresh.
- 1 cup shredded lettuce
- grated cheese Optional; any cheese will work, Mexican blend, cheddar, etc.
Homemade Taco Seasoning (You can use store-bought seasoning if you wish.)
- 1 tablespoon chili powder
- 1 teaspoon cumin
- ½ teaspoon smoked paprika
- ½ teaspoon garlic powder
- ½ teaspoon onion powder
- salt and pepper to taste
- cayenne pepper Optional for spicy. Adjust to taste.
Instructions
Cook the Meat
- In a skillet over medium heat, cook the ground beef until the meat is browned. Drain any excess fat. Drain the fat from the beef or pat the beef dry with paper towels to blot any excess fat. This will help prevent soggy quesadillas. This is important.
- Add the taco seasoning and diced onions to the skillet and stir to combine with the meat mixture.
Assemble the Quesadillas
- Start by placing a large flour tortilla on a flat surface. Add the filling: (I like this order: ½ cup seasoned beef, cheese sauce, tostada, Greek yogurt or sour cream, tomatoes, lettuce, optional shredded cheese) in the center, creating a circular mound. Keep the filling about 1–2 inches from the edges.
- Place a smaller flour tortilla (or a trimmed piece of a large one) directly over the filling to help seal the wrap and prevent spillage.The extra tortilla acts like a “lid” on top of your filling mound. Without it, there’s a hole in the center once you start folding, and your fillings can spill out when cooking or flipping. It gives the folds something to grip onto, helping the crunchwrap stay flat and evenly sealed in that iconic hexagon shape.No small tortilla? You can cut one of your large tortillas into a circle or wedge that fits the center. It doesn’t have to be perfect—just enough to cover the filling.
- Begin at one edge of the large tortilla and fold it up over the center. Continue working around the tortilla, making small pleats or folds, overlapping each one tightly over the last to form a hexagon or circle.
- Make sure the folds are tight and secure. The crunchwrap should be fully closed with no filling exposed.
Sear the Quesadillas
- Heat a skillet over medium heat (add oil to the skillet if you are not using non-stick) and place the crunchwrap seam-side down. Cook for 2–3 minutes or until golden brown. Flip and cook the other side until crisp and golden.
- Slice in half and enjoy warm while it’s crispy and melty inside!
Notes
- Layer smart: Put wet ingredients (like sour cream or salsa) on top of the tostada, not underneath it. That keeps the bottom from getting soggy.
- Serve immediately: These are best enjoyed right after searing—hot, crispy, and melty.
Nutrition
Nutrition Data
Macros are provided as a courtesy and should not be construed as a guarantee. This information is calculated using MyFitnessPal.com. To obtain the most accurate nutritional information in a given recipe, you should calculate the nutritional information with the actual ingredients used in your recipe, using your preferred nutrition calculator. You are solely responsible for ensuring that any nutritional information provided is accurate, complete, and useful.

Leave a Reply